Suitable For
- 有 Python 基本概念 或 程式語言基礎
Prerequisite
- Software
- Python 3.8 or above ( 2024/01/26: Bleak 0.21.1 only support Python 3.8 or above )
- Hardware
- BLE device
- Computer with BLE support ( 支援 Bluetooth 4.0 以上的電腦 )
Code
本篇利用 Python 的 Bleak 套件來取得資料,並直接解析資料
Bleak 是 MIT 授權的開源套件,其相關的文件放在 Reference 1-3
本篇所有程式碼都放在 Github
-
安裝 Bleak
1pip install bleak -
import Bleak 並且掃描周遭裝置
 1
 2
 3
 4
 5
 6
 7
 8
 9
10
11
import asyncio from bleak import BleakScanner, BleakClient async def main(): # Scan for all available devices devices = await BleakScanner.discover() for device in devices: print(device) asyncio.run(main())執行結果如下圖:
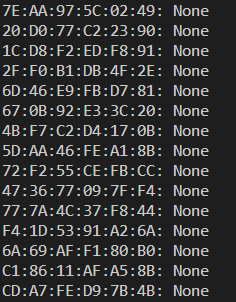
會找到所有周遭的裝置,並且列出 裝置地址 與 裝置名稱,後續可以利用這兩個資訊來建立連線
-
透過指定 裝置地址 或 裝置名稱 來建立連線
-
指定裝置名稱
 1
 2
 3
 4
 5
 6
 7
 8
 9
10
11
12
13
14
import asyncio from bleak import BleakScanner target_device_name = "YOUR_DEVICE_NAME" async def main(): # Scan for all available devices devices = await BleakScanner.discover() for device in devices: if device.name == target_device_name: print(f"Found target device: {device.name}, {device.address}") asyncio.run(main()) -
指定裝置地址
 1
 2
 3
 4
 5
 6
 7
 8
 9
10
11
12
13
14
import asyncio from bleak import BleakScanner target_address = "YOUR_DEVICE_ADDRESS" async def main(): # Scan for all available devices devices = await BleakScanner.discover() for device in devices: if device.address == target_address: print(f"Found target device: {device.name}, {device.address}") asyncio.run(main())
-
-
建立連線後,表列出此裝置所支援的所有 Services 和 Characteristics
 1
 2
 3
 4
 5
 6
 7
 8
 9
10
11
12
13
14
15
16
17
18
19
20
21
22
23
24
25
import asyncio from bleak import BleakScanner, BleakClient target_device_name = "YOUR_DEVICE_NAME" async def main(): # Scan for all available devices devices = await BleakScanner.discover() for device in devices: if device.name == target_device_name: print(f"Found target device: {device.name}, {device.address}") # Connect to the target device async with BleakClient(device) as client: print(f"Connected: {client.is_connected}") services = await client.get_services() # Print all services and characteristics for service in services: print(f"Service: {service.uuid}") for char in service.characteristics: print(f"\tCharacteristic: {char.uuid}") asyncio.run(main())執行結果如下圖:
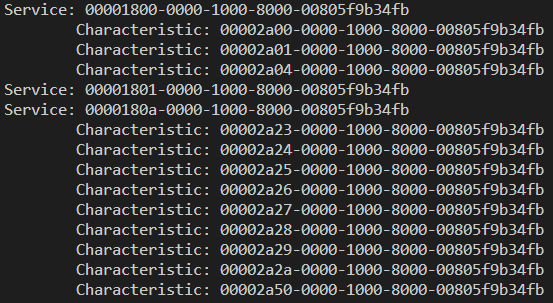
上圖表示的是此裝置所支援的所有 Services 和 Characteristics,僅有列出 UUID,此 UUID 是上一篇文章中提到的 ATT 中的 Attribute Types,代表服務類型
具體的服務類型需要參考 藍牙 或 裝置 規格書
依照藍牙規格書可以對應出上圖中的服務類型:
類型 UUID 名稱 Service 0x1800 Generic Access service Characteristic 0x2A00 Device Name Characteristic 0x2A01 Appearance Characteristic 0x2A04 Peripheral Preferred Connection Parameters Service 0x1801 Generic Attribute service Service 0x180A Device Information service Characteristic 0x2a23 System ID Characteristic 0x2a24 Model Number String Characteristic 0x2a25 Serial Number String Characteristic 0x2a26 Firmware Revision String Characteristic 0x2a27 Hardware Revision String Characteristic 0x2a28 Software Revision String Characteristic 0x2a29 Manufacturer Name String Characteristic 0x2a2a IEEE 11073-20601 Regulatory Certification Data List Characteristic 0x2a50 PnP ID -
透過指定 Service 和 Characteristic 來取得資料
 1
 2
 3
 4
 5
 6
 7
 8
 9
10
11
12
13
14
15
16
17
18
19
20
21
22
23
24
25
26
27
28
29
30
31
32
33
34
import asyncio from bleak import BleakScanner, BleakClient target_device_name = "YOUR_DEVICE_NAME" DEVICE_INFO_SERVICE_UUID = "0000180a-0000-1000-8000-00805f9b34fb" MANUFACTURER_NAME_CHAR_UUID = "00002a29-0000-1000-8000-00805f9b34fb" MODEL_NUMBER_CHAR_UUID = "00002a24-0000-1000-8000-00805f9b34fb" async def main(): # Scan for all available devices devices = await BleakScanner.discover() for device in devices: if device.name == target_device_name: print(f"Found target device: {device.name}, {device.address}") async with BleakClient(device) as client: print(f"Connected: {client.is_connected}") services = await client.get_services() print("Reading device information...") for service in services: if service.uuid == DEVICE_INFO_SERVICE_UUID: print(f"Device Information Service: {service.uuid}") for char in service.characteristics: if char.uuid == MANUFACTURER_NAME_CHAR_UUID: manufacturer_name = await client.read_gatt_char(char) print(f"\tManufacturer Name: {manufacturer_name}") elif char.uuid == MODEL_NUMBER_CHAR_UUID: model_number = await client.read_gatt_char(char) print(f"\tModel Number: {model_number}") asyncio.run(main())執行結果如下圖:

後續可以透過 client.read_gatt_char(char) 來取得資料,並且透過 client.write_gatt_char(char, data) 來寫入資料